How to Email an Invoice or Credit to Your Customers
Once you have created an invoice for your customer, you can email the invoice to them through Patriot Software. Be sure that you have added each customer’s email address to their “Info” tab in their customer record before sending invoices by email. You can also email a credit after you have issued a credit to your customer.
Customizing Your Customer Email Template
Before you send an invoice or credit via email, you can customize the email template that you’ll use to email each customer.
Accounting Premium customers can also customize the layout and add an accent color to invoices. See Customizing Your Invoice Template for details.
Not sure what to say when sending an invoice via email? Check out our blog posts about creating invoice payment terms that could help your cash flow.
Go to Settings > Accounting > Email and Document Templates > Invoice Templates to customize your email template when you mail invoices to your customers.
Go to Settings > Accounting > Email and Document Templates > Credit Memo Templates to customize your email when you email a credit to your customers.
You can insert “data tags,” which are standard pieces of information from the invoice/credit, into the subject line and body of your email. The default template already uses the following data tags, and you can remove or change where they appear in your email:
- Customer Full Name
- Customer First Name
- Customer Last Name
- Invoice Number (or Credit Number)
- Invoice Date (or Credit Date)
- Invoice Due Date
- Balance Due – This includes any partial payments already made.
- Company Name
Your Email Address
The email will be sent from the email address “invoices@PatriotSoftware.com.” The email address name will be customized with your business name and will read “On behalf of [your business name]. However, if your email recipient replies to the email, the reply will be sent to your email address. By default, this will be your email address on record in your Patriot account. You can change this, if needed. You won’t be able to insert any data tags here.
Email Subject
You can customize your email subject line, and insert any data tags by placing your cursor in the location that you want to insert, and click the data tag from the menu above.
Email Body
You can customize your email message and use any of the data tags. Insert a new data tag by placing your cursor in the location you want to insert the tag. Then click the data tag you want to insert. Be sure that you leave a space in front of and/or after the data tag so that it formats correctly in the email.
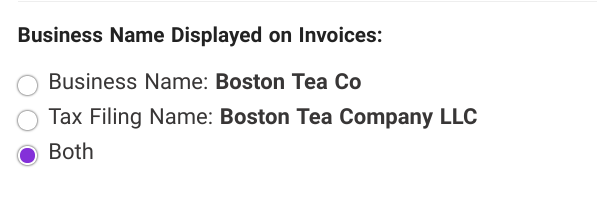
Select business name display on invoices
This field will show only if your tax filing name is different than your company name. You can choose to display your tax filing name, your DBA, or both. Select the radio button of the business name you would like displayed on your invoices.

Emailing an Invoice to Your Customers
After you have created an invoice for your customer, you will see a confirmation page with links to various actions for this invoice. Click “Email.” You can also select the “Email” action from Reports > Accounting > Customer Reports > Invoices.
You will see a preview of the email to be sent to your customer, which will use the format you had set up in the Templates page. The email will automatically fill in the address(es) that are on the customer record. You can send this email to include up to five different email addresses. A PDF document of the invoice will be attached to the email.
You can also allow your customers to pay you with a credit card, and a link to pay will be included in the email. For more details, see Accepting Credit Card Payments on Customer Invoices.
You can still customize the content of this particular email, if needed. When you are ready to send, click “Send Email.” An email will immediately be sent to your customer with the invoice attached. You can view the status history with the date and time you sent the email.
Emailing a Credit to Your Customers
After you have created a credit for your customer, you will see a confirmation page with links to various actions for this credit. Click “Email.” You can also find a customer credit by going to the customer record and clicking the “Credits” tab.
You will see a preview of the email to be sent to your customer, which will use the format you had set up in the Templates page. The email will automatically fill in the address(es) that are on the customer record. You can send this email to include up to five different email addresses. A PDF document of the credit memo will be attached to the email.
You can still customize the content of this particular email, if needed. When you are ready to send, click “Send Email.” An email will immediately be sent to your customer with the credit memo attached. You can view the status history with the date and time you sent the email.
Both the invoice and credit emails will be sent by Patriot Software’s email servers, so they will not appear in your own personal “Sent Items” email box. The emails will be sent to your customers from the address “invoices@PatriotSoftware.com.” If your customer replies to the email, the “reply to” email will be your email address that you entered in your Email Preferences, or customized on the Email Preview page. So you will receive any replies from your customer for this email.
Your feedback will not receive a reply. If you have a specific issue, please reach out to our support team here.


